
EVVIS-QR1 USB Config tool
Download
You should start by downloading the package and extracting to a folder on your hard drive.
EVVIS-QR1 USB Config tool does not need to be installed, it can be launched as a standalone executable file. No driver installation is needed as well.
Important: The folder the exe file is placed in should be writable by the current user (as it creates a couple of temporary files in the same directory).
Burning a seed
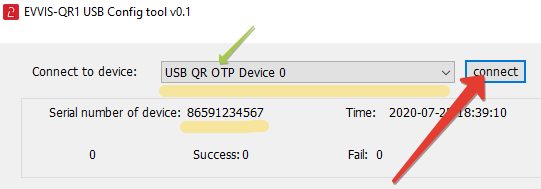
Select the device from the 'Connect to device' list (usually 'USB QR OTP Device 0') and click 'Connect'. 'Successful operation' message should be shown, and the serial number of the device should appear under the list.
Enter the seed (in base32 format) or click on "random 32/64 chars" buttons to generate a random seed. If you need to read the seed from a TOTP QR image, click on 'QR from screen' to use a QR code currently on the screen (the USB Config app will minimize when taking a screenshot) or 'QR from file' to read from an image file.
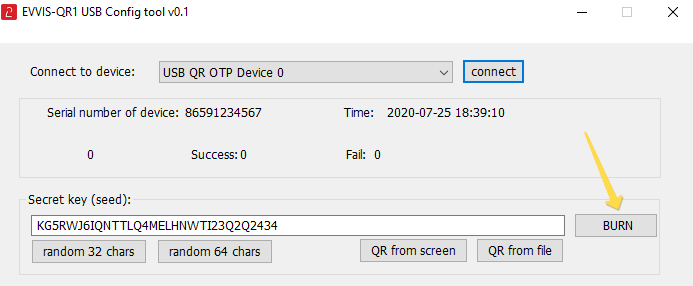
Click on the 'Burn' button to complete the process. A successful operation will be logged in the log window on the bottom of the app.
Configuring TOTP profile parameters
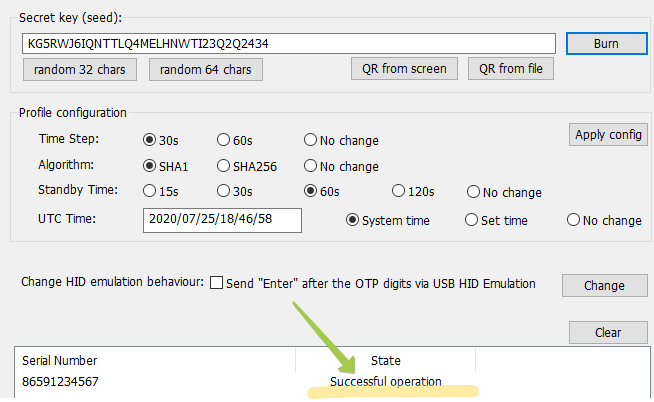
You can also change additional configuration parameters of the device. Choose the options on the screen and click on 'Apply Config' button to complete the process.

The following parameters are available to be modified:
- Time step: the time offset of the OTP generation (OTP regenerates after N seconds). Choose between 30 seconds and 60 seconds. This should match the TOTP parameters of the authentication system.
- Algorithm: the hashing algorithm of the secret key. Can vary between sha1 and sha256. This should match the TOTP parameters of the authentication system.
- Standby time: the period after which the screen of the display will turn off (to save the battery). This only applies when the device runs on its battery; if plugged in, the display is constantly on.
- UTC Time: this allows to sync the system clock of the hardware token. Keep it as 'System time' to automatically sync with the computer's clock the app is running on. To manually modify the time, select 'Set time' and enter the time in the format as in this example: 2020/07/25/18/56/33 = (year 4 digits)/(month 2 digits)/(day 2 digits)/(hour 2 digits)/(minutes 2 digits)/(seconds 2 digits)
HID Keyboard emulation - 'Enter' keystroke
EVVIS-QR1 device can send the OTP over USB thanks to HID emulation function (available under Windows systems without any additional drivers). This will allow minimizing the user actions needed to authenticate with any 2FA-enabled system.
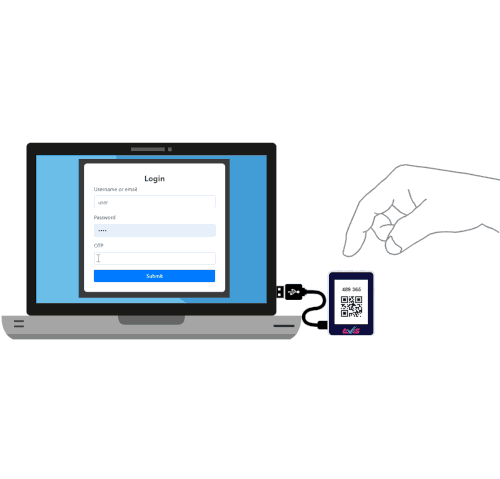
You can configure the device to send the OTP digits together with 'Enter' keystroke (ASCII chr № 13) - this adds the convenience of minimizing user actions needed for logging on to a system (i.e. a Web login form with 2FA field), as the pressing the Enter key on the keyboard will be emulated, and the form requesting the OTP will be submitted automatically without the need of clicking the submit button.

To change this behaviour, check or uncheck the 'Send "Enter"...' checkbox and click on Change.
The video below shows the behaviour of the device with this feature enabled:
Subscribe to our mailing list
Want to keep up-to-date with the latest Token2 news, projects and events? Join our mailing list!