
Using classic tokens for Native OTP Authentication with NetScaler
 Citrix ADC(NetScaler) supports one-time passwords (OTPs) without having to use a third-party server. One-time password is a highly secure option for authenticating to secure servers, as the number or passcode generated is random.
 We are presenting you a guide showing how to implement MFA with classic TOTP tokens using the Native OTP functionality of Citrix Netscaler/ADC without any additional components. Please note that this guide describes only one of the possible solutions, you can also secure Citrix login accounts using TOTPRadius or programmable tokens as well.
Advantages of having Native OTP support
• Reduces operating cost by eliminating the need to have an extra infrastructure on an authenticating server in addition to the Active Directory.• Consolidates configuration only to Citrix ADC appliance, thus offering great control to administrators.
• Eliminates the client’s dependence on an extra authentication server for generating a number expected by clients.
The native OTP solution is a two-fold process and the workflow is classified as the following:
• Device registration
• End user login
There are currently many excellent articles available that explains how to set up the native OTP functionality and how it works.
But they all describe using of programmable tokens:
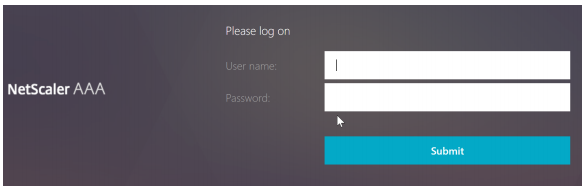
User navigates to ManageOTP URL e.g., https://gtw.token2.ch/manageotp (gtw.token2.ch is address of Citrix Gateway with AAA Virtual Sever enabled as an Authentication server).
We will be presented with initial logon page that only requires LDAP logon credential: initial logon page that only requires LDAP logon credential:
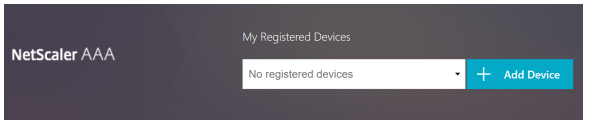
After login with a valid credential, we will see the manage device page as follows:
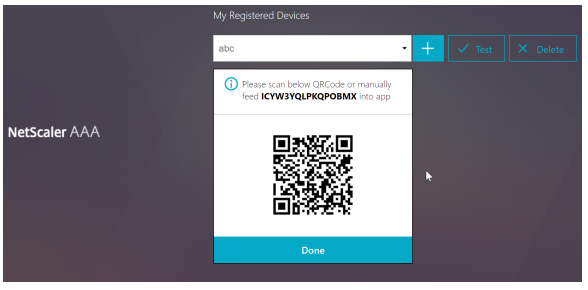
After click ‘+’, type in the device name, click ‘go’, and click ‘done’, we will see a QR code generated. This indicates the device has been registered:
Using classic tokens in Native OTP
In this guide we would like to talk about a PowerShell script, called OTP4ADC.ps1 that makes it possible to use classic tokens in ADC Native OTPwithout third-party solutions. You can see more details about the script here.
Token2 is not directly responsible for any glitches in this script (our engineers tested it in operation and were satisfied with the results)
This script has user-friendly GUI and functionality to add user-defined seed (secret key) to ADC Native OTP:
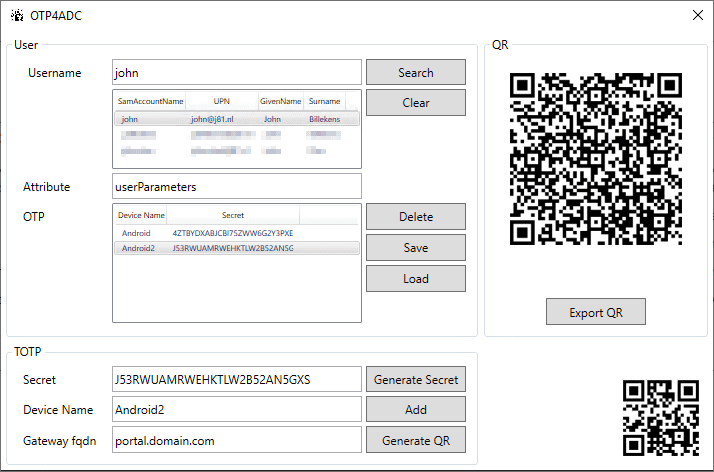
Also, It is possible to change attribute name( userParameters is default value.) It has to match the attribute name set in LDAP Actions on ADC AAA Virtual Server deploying stage.

You can find the latest version on GitHub: https://github.com/j81blog/OTP4ADC.
How to bulk import seeds (secret keys)
Starting from v1.0.1 version, OTP4ADC supports "Bulk" options via command-line. Token2 has developed ADC Bulk Import tool to automate importing Secret keys.This tool is fully based on OTP4ADC options and adapted to import seeds from Azure CSV format file. The following are the pre-requirements to run this tool :
• OTP4ADC(v1.0.1 and later)
• Token2 classic token device(s)
• A CSV file for your token device(s). You can request the CSV file from your order page after successful delivery. Make sure you choose "CSV for Azure MFA.." format
For the script to work, make sure that files OTP4ADC and ADC Bulk Import tool.ps1 are located in the same folder.
Prepare the CSV file
The CSV file sent by Token2 does not contain the UPN for your users, so you have to add that information. Open the file in a text editor and add the missing information.The final file should look like shown below:
upn,serial number,secret key,timeinterval,manufacturer,model
[email protected],60234567,1234567890abcdef1234567890abcdef,30,Token2,c202
When the CSV file is ready , run ADC Bulk Import tool.ps1 with PowerShell:
1)Enter your Citrix Gateway URI:

2)Then enter attribute name:

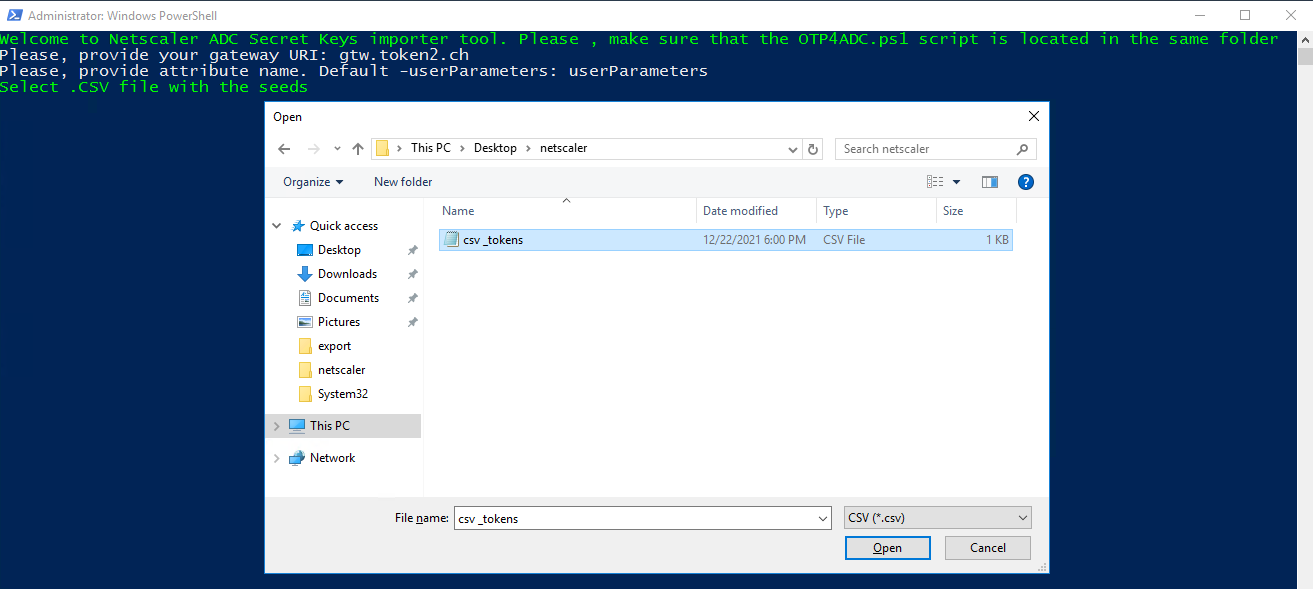
3) Select previously prepared CSV file to import :
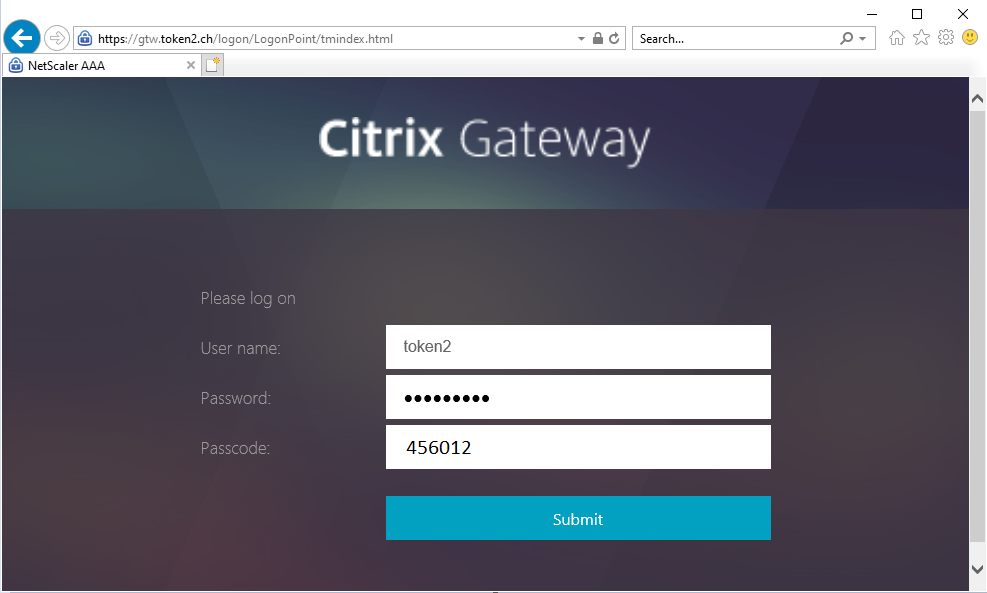
After the script execution is completed, you can log in to gtw.token2.ch using AD password as the first factor and OTP code from registered token as the Second:
In case of unsuccessful completion of the work, the script creates and writes an error to a file called error.txt located in the root folder.
Both scripts used in this guide can be downloaded from here or from the GitHub fork. Alternatively, you can download the OTP4ADC PowerShell script directly from the original GitHub project and use it with our wrapper script below:
function Open-FileDialog {
        [cmdletBinding()]
        param(
            [Parameter()]
            [ValidateScript({Test-Path $_})]
            [String]
            $InitialDirectory
        )
    Add-Type -AssemblyName System.Windows.Forms
    $FileBrowser = New-Object System.Windows.Forms.OpenFileDialog
    if($InitialDirectory){
        $FileBrowser.InitialDirectory = $InitialDirectory
    }

    else{
    $fileBrowser.InitialDirectory = [Environment]::GetFolderPath('Desktop')
    }$FileBrowser.Filter = 'CSV (*.csv)|*.csv'

[void]$FileBrowser.ShowDialog()
$FileBrowser.FileName

}

Write-Host "Welcome to Netscaler ADC Secret Keys importer tool. Please , make sure that the OTP4ADC.ps1 script is located in the same folder" -ForegroundColor Green
$gatewayURI= Read-Host -Prompt "Please, provide your gateway URI"
$attribute= Read-Host -Prompt "Please, provide attribute name. Default -userParameters"
 Write-Host "Select .CSV file with the seeds" -ForegroundColor Green
 Start-Sleep -s 1
$FileBrowser = Open-FileDialog .\

$file = Import-Csv $FileBrowser
foreach ($line in $file)
{


Try {
$DeviceName="Token2"+$line.model

$results= @( .\OTP4ADC.ps1 -attribute $attribute -GatewayURI $gatewayURI -username $line.upn -DeviceName $DeviceName  -Secret $line."secret key" -ExportPath Temp)
 }
Catch {

$_ | Out-File .\errors.txt -Append

}

}
Remove-Item -LiteralPath "Temp" -Force -Recurse

$results
Time Drift of Classic Tokens
In the design of Native OTP, there is a time-drift tolerance concept called leeway, which determines how long a token remains valid after its expiry. Citrix ADC uses a default leeway value of 3. This means a token remains valid until three new tokens have been generated. With a 30-second time step, each token is therefore valid for 90 seconds (3 × 30s). If you prefer tokens to remain valid for a shorter period, you can change this by applying the following nsapimgr knob:nsapimgr_wr.sh -ys arg1=1 -ys call=ns_otp_set_leeway -cores=all
The value of arg1 specifies the leeway:
1 → OTP remains valid for 1 × 30s after expiry
2 → OTP remains valid for 2 × 30s after expiry
… and so on
The maximum allowed value for arg1 is 10.
Subscribe to our mailing list
Want to keep up-to-date with the latest Token2 news, projects and events? Join our mailing list!