
Using Token2 FIDO2 Security keys for OpenSSH
Security keys significantly increase the security level of any solution. Today, Token2 security keys could help establish a secure connection by applying FIDO functions through SSH (Secure Shell), which is a common connection between client and server. Starting from OpenSSH 8.2 version added support for U2F/FIDO2 security keys. Detailed information is available on the official OpenSSH website.Generally speaking, prior to the release of OpenSSH 8.2, there were methods for using hardware keys with SSH, but in most of these solutions, it was necessary to use third-party software and sometimes also configure hardware keys in a special way.
In this guide, we will show how to use Token2 Security keys for SSH connection. You take a security key, generate a special type of SSH key, add the public key to your server as usual, and you're done! Let's see how it works in real life.
Requirements:
• Windows 10/11 as a Client• Ubuntu 20.04.6 LTS as a Server
• A Token2 FIDO Security key with PIN already set
Prepare Client configuration(Windows10/11)
Firstly, we will check the OpenSSH version by running the command ssh -V in cmd. The result will be below:
Windows comes with OpenSSH 8.1, which doesn't support hardware keys.So we need to upgrade the existing OpenSSH release.
1. Download the latest .zip release of OpenSSH for Windows.
2. Edit folder permissions for C:\Windows\System32\OpenSSH so you have access to overwrite the files in this folder:

3. Open Task Manager and end any active sshd.exe or ssh-agent.exe processes. You must end these processes before you can overwrite these files.
4. Overwrite the files in System32\OpenSSH with the latest OpenSSH files you downloaded.
5. Open PowerShell in administrator mode.
6. Run the helper script install-sshd.ps1 (included with the OpenSSH files) to install the ssh-agent service.
7. Start the ssh-agent service:
 Get-Service -Name ssh-agent | Set-Service -StartupType Automatic
 Start-Service ssh-agent
8. Confirm that ssh was upgraded to the latest version: ssh -V
9. Confirm that the ssh-agent service was started successfully: ssh-add -L
10. (Optional) Set the owner of System32\OpenSSH back to NT Service\TrustedInstaller (this is the default owner of critical Windows files to prevent accidental file changes or deletions).
Next, we can proceed to generate a new key pair using the Token2 security key.
Generate public and private key pair
According to the official website, two new types of public keys appeared in OpenSSh to support Fido2 keys: "ecdsa-sk" and "ed25519-sk" (-sk stands for security key).
Please note that the first type should be supported by any FIDO2 key, and the second one is optional. Regular Token2 security keys support only the ecdsa-sk type. Our PIN+ series keys support both ecdsa-sk and ed25519-sk
If you are using multiple keys (we recommend doing so as the key can be lost or broken), it may make sense to give a friendly name (or Fido2's model) before proceeding to the next step.
It is useful when creating SSH keys to distinguish which SSH key is associated with which security key.
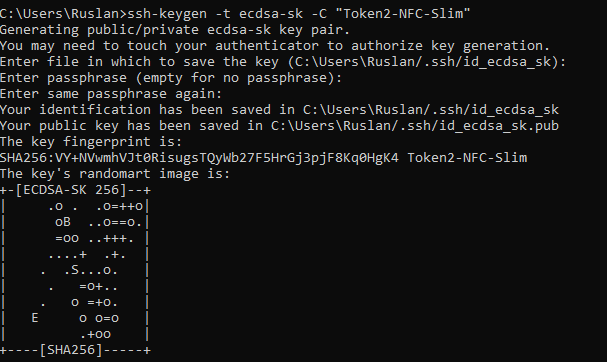
1. Plug in your FIDO devices and enter:
ssh-keygen -t ecdsa-sk -C "T2F2-NFC-Slim"
(here -t specifies the type of SSH key we are generating, and -C adds a comment).
2. Enter the PIN for your devices.
3. Touch your FIDO device.
As usual, ssh-keygen asks for a file name to store the SSH key pair (you can supply your own or accept the default) and prompts you to supply a password.
If you are going to generate several key pairs on the same client PC, it is better to give them specific names. Otherwise, the files will be overwritten.
This option (passphrase) is optional, but we recommend that you always protect your private SSH keys with a passphrase, even with extra security.
The result of ssh-keygen will be, as always, two files, one with private and the other with public SSH keys. Behavior familiar from working with regular SSH keys.
There is only one difference: the private key stored on the disk does not work until the corresponding Token2 security key is connected to the machine and you have not pressed the button on it!
Put the public key pair on the target server.
As with normal SSH keys, we need to add the public key to the server. This can be done in many ways; we will choose the simplest one. On the client machine, open the .pub file,which wasgenerated the previous section in a text editor and copied its contents. In our case, it looks like this:
[email protected] ArpMOykjxtNH61TBIvLgvbj5TjWF+gyRpa9Q+QAAAAEc3NoOg== T2F2-NFC-Slim
Now let's go back to the server and add this key to the file:
/home/$USER/.ssh/authorized_keys
We save the file and return again to the client machine.
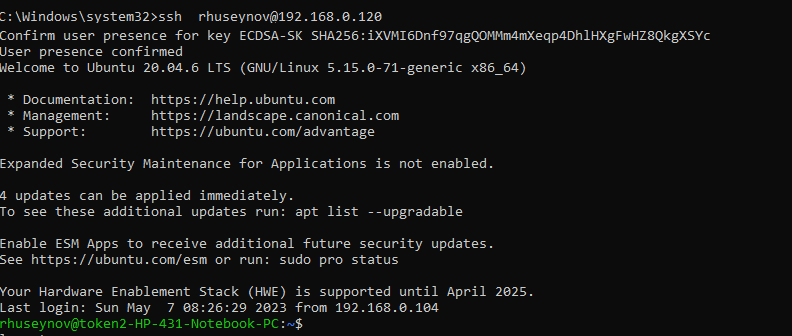
Test connection at client
At the client, use ‘ssh [username]@[server ip]’ to connect. Make sure your security key is plugged in. The client will ask you to touch your devices.If you don’t touch the devices in 10 seconds the client will ask you for password(set in sshd_config).
If touched and passed the authentication, the connection will success.
Some settings in server configuration
You can only allow SSH connections with keys that are paired with hardware tokens. This is quite possible and quite easy to configure; you just need to explicitly specify what types of keys we allow.So, we connect to the server, use sudo to get root privileges and open the /etc/ssh/sshd_config file in a text editor of your choice.We need to add the following line:
PubkeyAcceptedKeyTypes [email protected],[email protected]
Also, make sure that "PublicAuthentication" is set to “yes”.Check the path of authorized_keys. If your client user is root, set “PermitRootLogin” to “yes”.
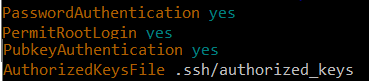
Change PasswordAuthentication to "no" if you don't want to be asked for a password.
How to save SSH keys on a Token2 Fido2 security key
FIDO/U2F OpenSSH keys consist of two parts: a key handle, which is stored in a file on disk, and a private key that is unique for each FIDO/U2F security key and cannot be retrieved from it.During the authentication process, these two parts are combined to produce the real key, which is then used (to sign the authentication request).
For keys that need to be transferred between machines, it can be a problem to copy the private key file. To avoid this, tokens implementing the newer FIDO2 standard support so-called resident keys.
This allows you to extract the key handle from the hardware key. You can use ssh-keygen with the -O resident option when generating an SSH key pair.
Later, you can extract your SSH keys from the security key and write them to disk as files. To do this, you need to connect your Token2 Fido2 key and run the ssh-keygen -K command.
The whole command might look something like this:
ssh-keygen -t ecdsa-sk -O resident -C "T2F2-NFC-Slim" or, alternatively, if you wish to differentiate between different servers or accounts:
ssh-keygen -t ecdsa-sk -O resident -O application=ssh:servername1This approach allows you to be sure that you have your SSH keys with you whenever you have your security key.
You don't have to worry about copying private and public SSH keys (as files) between different machines. This is quite convenient, but you need to consider the associated risks.
So, if you need to start working in a new environment (on a new machine), just connect your security key and run the command
ssh-keygen -K
This command will extract all recorded SSH keys (both private and public!) and save them into a running ssh-agent.
First, if you choose to store your SSH keys on a security key, you need to secure it with a PIN. Otherwise, anyone who gains access to the security key will be able to use your SSH keys as well.
Subscribe to our mailing list
Want to keep up-to-date with the latest Token2 news, projects and events? Join our mailing list!