
Token2 NFC Burner for Windows v 0.2
A Windows application for the second generation of Token2 programmable tokens with additional operations for bulk provisioning. This application will require an external USB NFC reader (which will be available to order in our online shop) or a built-in NFC module (existing on some models of modern laptops). So far, the application has only been tested under Windows 10 and Windows 8 64 bit.Download (zip archive file)
Burning a seed
1. Launch the "_T2 NFC Burner 0.2.exe" file, then select the NFC device from the drop-down list and click on “Connect”.You should see a message box notifying you of a successful operation.
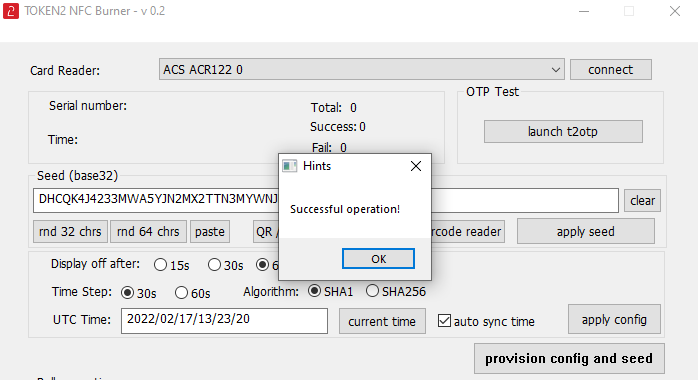
2. Place the token on the NFC module and wait for its serial number to appear. Make sure the token is powered on (the display should show digits or dashes).

3. Enter the seed (in base32 format) or click on the "rnd 32 chrs" button to generate a random seed.
("rnd 64 chrs" button is used for generating seeds for the sha-256 algorithm).
4. Click on the "apply seed" button. A log entry with the serial number and "Seed applied successfully" text will be logged in the log window.

It is possible to compare the OTP generated on the token with the OTP generated by our t2otp tool(click "launch t2otp" button).
QR Code operations
You can extract the base32 secrets from an image containing a QR code. Scan the QR code shown on the screen (the app will minimize itself,take a screenshot and then look for a QR code containing the TOTP seed) or decode it from an image file. Only one QR code should be present at a time.
You can also specify an image file with a QR code. The app will get a seed from this file. In addition, you can use a 2D barcode scanner to read the QR code from a different screen or paper using 'QR / barcode scanner' button.

You can test the current seed OTP generation using t2otp.exe tool (included in the same archive, but available as a separate app as well)
Configuration
1. Launch the exe file, then select the NFC device from the drop-down list and click on “Connect”.You should see a message box notifying you of a successful operation.
2. Place the token on the NFC module and wait for its serial number to appear.
3. Use the advanced settings tab to set up the configuration of the token:
-The current system time of the PC the burner application is running on by clicking on the "current time" button.
-Hash algorithm (sha-1 or sha-256)
-Time offset (30 seconds or 60 seconds)
-Automatic display time out (15s, 30s, 60s, 120s)

4. Click on the "apply config" button. A log entry with the serial number and "Config applied successfully" text will be logged in the log window.
The token models with the "Restricted" time sync feature will have to be reseeded after this operation. Check the specifications of the token model before syncing the time.

Burning configuration and seed together
In many cases, it is recommended to update the token's system time before provisioning a new seed. With “provision config and seed” button, you can burn configuration (which includes time sync) and the seed at the same time. The following text will be logged in the log window:
Bulk operations
The main advantage of this release is the availability of the bulk operations feature, primarily for provisioning the tokens to be used with Azure MFA. The user puts the tokens one by one on the NFC device, and the system itself performs the burning. When placing a token, the serial number of the token appears, and after burning, the serial number disappears. Then you can put the next token. Also, each burn is accompanied by a log output to the log window.Please make sure the token is powered on before placing on the NFC pad.

1) automatic mode. This checkbox enables bulk operations mode. If this is enabled, placing a powered-on token on the NFC area will apply configuration and seed automatically.
2) auto-randomize seeds. If this option is enabled, the app will burn a unique random seed for each token. Make sure this option is enabled if you plan to use automatic mode (otherwise all tokens will be provisioned with the same seed).
3) auto-apply config. If this option is enabled, configuration settings will be burned together with the seed.
4) save as csv. With this option enabled, you can prepare a CSV file in a format compatible with Azure MFA as described in this guide. It is also a possible to convert the Azure MFA CSV file to a Duo-compatible format (which consists of the serial number and the secret in Hex format). Please use this script for the conversion.
Salt randomizer
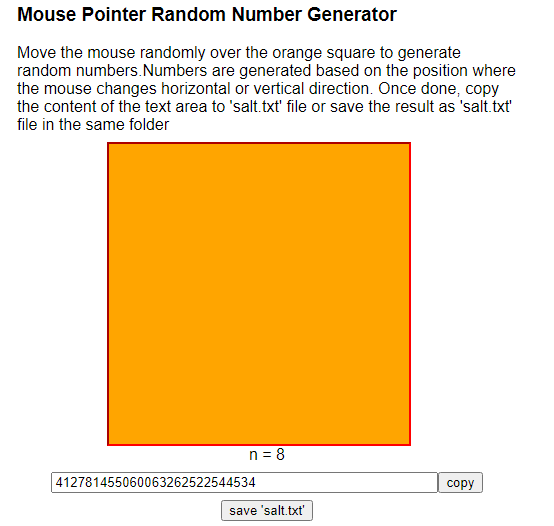
This app also includes a tool for generating salt based on mouse movement. In cryptography, a salt is random data that is used as an additional input to a one-way function that hashes data. Launch "_T2_Salt Randomizer.htm" file in any modern browser and move the mouse pointer over the orange rectangle. This will generate a series of random digits based on the movement. Save the generated data to the root folder of the program as "salt.txt" before starting the seed generation process. This file will be used as a salt for the randomization functions of the app.
Previous versions
This page describes the version 0.2 of Token2 NFC Burner for Windows . Previous versions of the tool are available here.Subscribe to our mailing list
Want to keep up-to-date with the latest Token2 news, projects and events? Join our mailing list!